|
In this chapter we modernize the Payroll application to incorporate the use of channels and containers.
5.1 Examining existing functionality
When considering the modernization of an application, the first pass should focus on the functionality that is still valid versus older functionality that can be
ignored as it is no longer applicable in the new environment.
Figure 5-1 shows a copy of a Departmental Browse screen that was available in the original application.
It was invoked by entering a department and employee on the main screen then pressing PF9, which displayed the current screen.

Based on the fact that the screen size only allowed 10 employee records, the corresponding code browsed an entire department placing each record in a temporary
storage queue in CICS, then rendering the screen with the first 10 employee records.
The user could page through the contents of the department by using this screen and pressing PF11 to move forward and PF10 to move backward through the records.
As the presentation logic was moved from a 3270 screen to a browser, which could handle all records with a scroll bar, the code was removed reducing the size and
complexity of both the presentation and business logic modules.
A client simply can call the business logic program several times to retrieve all the records in a department and display them any way they prefer.
This is only one example of modernization.
Another example would be to convert the communication area from a commarea to the use of channels and containers.
5.2 Introduction to channels and containers
The channel and containers interface was added in 2005 to address a growing problem in the world of CICS.
The size of data that needed to be stored between pseudo-conversations or passed between programs was getting larger.
The maximum size of a commarea could never exceed 32k due to the field used to hold and specify the length of the commarea.
Another issue was customers were overloading the commarea with data from various different sources even if the program that was getting control did not make direct
use of it.
This was to ensure that some program in the link chain would eventually have access to the data and the easiest way to pass it was in the commarea.
The solution provided was channels and containers.
This interface uses a sixteen character channel name as an anchor and sixteen character container names to hold the data.
In theory, you can create an unlimited number of containers in a channel and they can be unlimited in size.
This allows CICS to once and for all resolve both the 32k commarea limitation as well as the overloaded copybook issue that results when using a commarea.
The presentation and business logic programs we have been using do not have an issue of commarea size, but the newer channel and containers interface can make it
easier for external systems to call the business logic program with this interface.
So, lets explore the changes required to modernize this application to use channels and containers.
5.3 From commarea to channels and containers
When converting to the use of channels and containers, the linkage section is no longer required.
As the data must be physically placed and retrieved from a container in a channel, we can simply provide the copy books in working storage (Figure 5-2).

If we choose, we can have a separate input and output container.
For that matter we can have a separate container for each structure.
Each separate area will require an additional named container and when passed to a receiving program, it can choose which containers it has an interest in viewing
and or replacing.
For simplicity, we have chosen to use one container to hold the old commarea contents.
In the code you can see that the major difference is the data must be read from a container prior to its use.
This is done with a “GET” command. As we also relied on the commarea length field, EIBCALEN, to determine first time through logic, the code on the left replaces
both the receiving of our data as well as the first time through logic.
Now, we simply “GET” the data from our channel called “payroll” out of a container called “old-commarea”.
If this command fails, then this is the first time through.
On the right hand side, you can see that we replaced the return with a commarea, by building a routine that “PUTs” the data into the container prior to the return
command which now references channel rather than commarea.
We have converted all “return with commarea” commands throughout this program to perform this routine prior to exiting the program.
The only other change in the presentation logic program is how it prepares for the call to the business logic and receives its results (Figure 5-3).
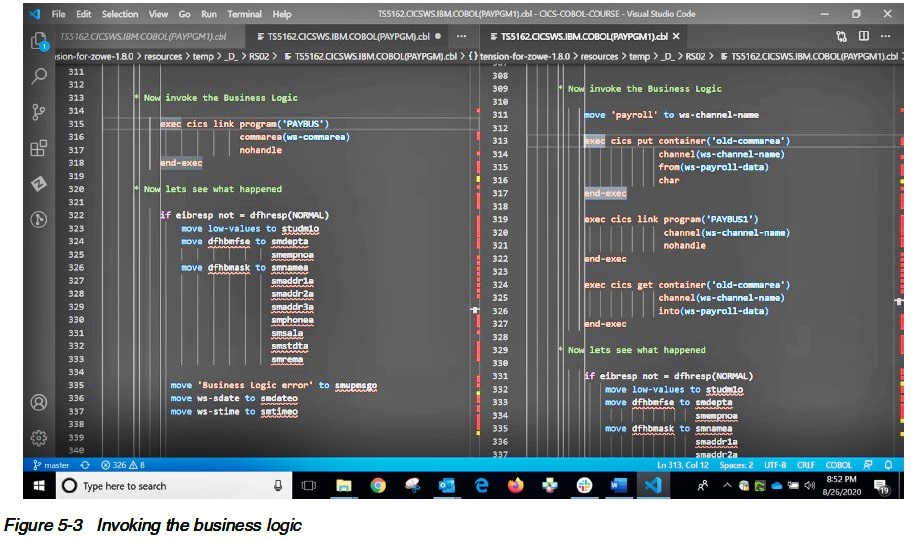
On the left hand side, you can see that in the older version of this program, that used a commarea.
We issued an EXEC CICS LINK with a commarea to invoke the business logic.
This was due to the fact that we were simply passing a pointer to where the data lived.
On the right hand side, you can see the new code that is required to pass a channel with containers to the business logic program.
We must first place the data in the container with a “PUT” command, then issue the link with the channel attribute.
When we return, we must issue a “GET” command to retrieve the results passed back from the business logic.
The remainder of the presentation logic program is the same as it was before.
The changes to the business logic program, PAYBUS, are smaller as this program does not link to any other program.
If it required a link to another program, we would have had to follow the same logic of PUT, LINK, GET that we saw a moment ago (Figure 5-4).
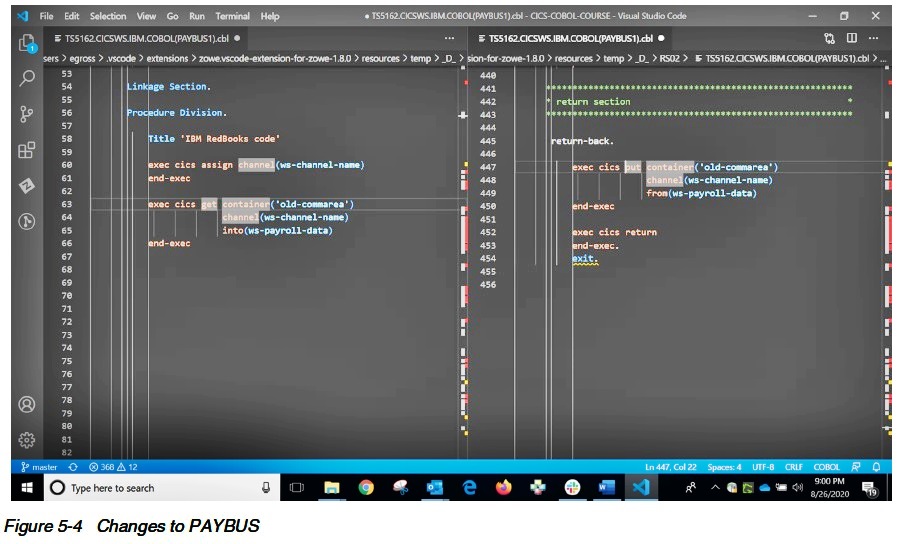
Since we chose to use a single container, we simply have to get that container into the copy book for reference in the program.
This copy book used to be in Linkage but was moved to working storage as part of the change to use channels and containers.
On the left you can see the code used on entry to this new version of PAYBUS.
We issue an ASSIGN CHANNEL command so we do not have to rely on the name of the channel being preset, we can simply find it out.
The container name must be known as there can be several in a channel.
As with the code seen earlier in the end of PAYPGM, the presentation logic program, we must make sure to PUT the data back in the channel before returning to the
calling program.
It is important to point out, had we split the data across multiple containers in a channel, we would need a separate GET container command to retrieve the data in
each container.
5.4 Working with CICS programs in Visual Studio Code
Now let’s have a look at how you make the changes to a CICS program using VSCODE and what is required to prepare a program change for testing in CICS (Figure 5-5).

If you install the IBM Z Open Editor extension in VSCODE, it will give you the ability to not only autocomplete COBOL instructions, but will also provide
autocomplete for CICS commands.
Simply start typing the CICS command and you will be automatically prompted with the commands for CICS.
As you press enter on your desired command, you can always press the CNTL + SPACE bar to have the prompt return for any and all attributes associated with that
command.
Using this feature allows you to ensure the command has the right syntax but will also make it more likely that the compile can complete without any syntax errors.
Once you have completed your changes you will need to recompile the program or programs that have changed.
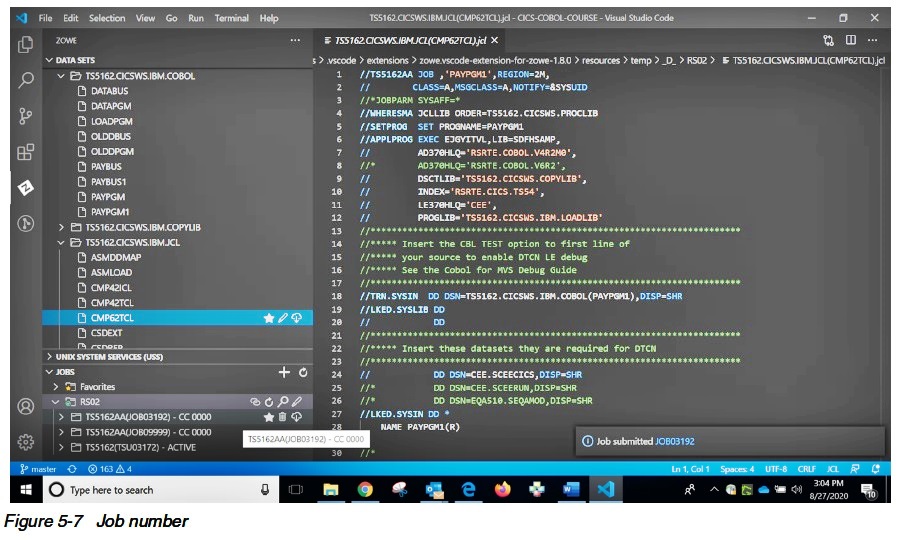
This is relatively easy to do in VS CODE if you have compile JCL already set up (Figure 5-6).

If you navigate to your JCL library and find the job that does a compile you can edit it by double clicking, or to simply submit the job select with a right mouse
click then chose submit job to submit the job.
Once submitted, you will receive a message in the lower right corner of the screen which will contain the job number of the JCL just submitted (Figure 5-7).
Using the left hand side in VS CODE, if you navigate to your jobs folder you should be able to find the matching job number.
In our case the condition codes were all zero, so everything worked. If not, the highest condition code will be displayed.
Should you need to see what went wrong, you can open the job as a file a review each of the steps (Figure 5-8).
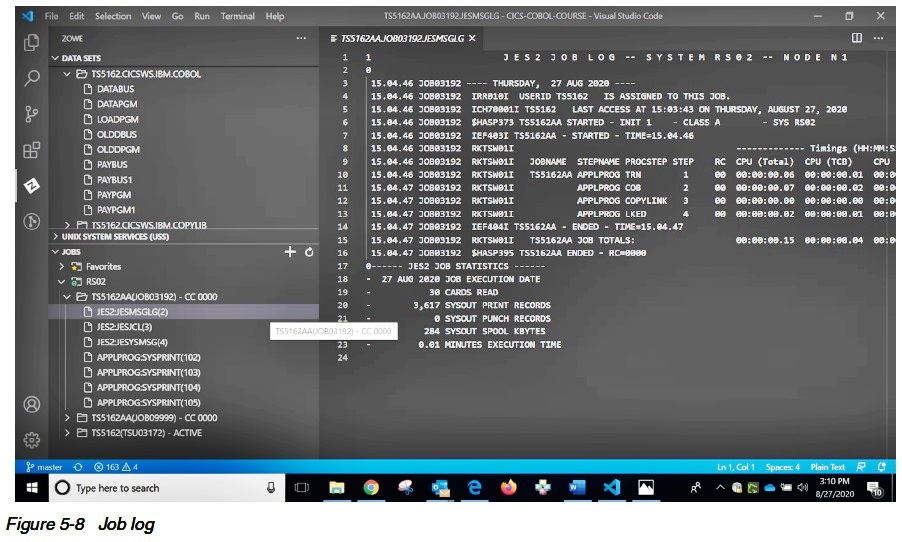
Here we opened the JES Message Log to review the return codes from each step.
If we found a non-zero return code, we could easily click on the SYSPRINT file just below the JES Message Log to see what went wrong in that step.
5.5 CICS and ZOWE
Although VS CODE may be installed with the IBM Z Open Editor extension, this will not give you the ability to work directly with a CICS region.
In order to create a connection to CICS to do some task, you must first install the Zowe CLI (Command Line Interface).
After that is successfully installed you must install the Zowe CLI plug-in for IBM CICS.
Information for installing both the plug-in and the CICS extension can be found at docs.zowe.org.
Once the plug-in and extension for CICS are installed, you can read the documentation for the available CICS commands by opening a new terminal in VS CODE and
issuing the command zowe cics --help (Figure 5-9).

The commands that are most useful when working with a CICS program are the “get” and “refresh” program commands.
However, to run these we must first create a profile for talking to our CICS region (Figure 5-10).

As you can see setting up a profile requires filling in a bunch of information.
At the very least you need the protocol (HTTP OR HTTPS), host and port number the CICS region will be listening to, a user id and password to connect with and
the region name.
In the example above we also used the CICSPlex® name in case the program we are working with runs in multiple regions.
To verify the program is defined in the region specified in the profile, simply use a “get” command (Figure 5-11).

The “get” command we used is a bit more complicated than the standard “get” command required.
Aside for specifying the region name and CICS program name we want to get; we have asked for the results to be returned in a table.
As part of the table we have asked for the attributes of program name, length, use count and status.
These attributes can be useful as we can watch them change if the program is run or if a change has increased or decreased the size.
One of the aspects of CICS that makes it very efficient is the fact that the first time a program is run it is loaded into core.
Subsequent calls to run the same program do not go out and load a new version, instead they use the version that was loaded the first time it ran.
This advantage save processing time but means that in order to get CICS to load a new version of the program we must force the issue.
The "refresh" command has many names depending on where it is issued from.
When done in CICS from a 3270 screen it is known as a newcopy or phasein.
When the command is issued from VS CODE using the zowe CLI extension for CICS it is known as a refresh.
Once the refresh is issued, we can now test our new version of the program.
If we changed the length of the program, we could issue another “get” request as the program length would show the size of the new version of the program, which
provides some assurance that we have changed the program.
This document was created or updated on December 17, 2020.
© Copyright IBM Corp.
|

